 Home
Home Notes
Notes Computer Tricks
 Sci-Tech
 FAQ
FAQ Contact
You try to delete a file and instead Windows flashes a warning saying that access is denied. There are several reasons why something like this happens. The following are the four steps to delete the file,
Step 1:
The simplest reason for this is that the file is open. For example, if it is a document that you are trying to delete, check to see if Word is using it. Shut down the program and then try deleting it.
Step 2:
Sometimes, though you’ve shut down the application running the file, the program may still be running in the background. In this case open task manager and end the application which you have recently closed.
Step 3:
If the file still remains, then restart your computer and start pressing F8 key when you hear the system beep. Go to safe mode and delete the file.
Step 4:
If you still can't delete the file, then try using this free software. You can download it here "Move On Boot". Download and install this software and simply drag and drop the file which you want. It will delete it on next system restart.
How to disable Windows error reporting in Windows 7!
1. Press Windows Logo button + R
2. Type "gpedit.msc" and press enter
3. Navigate to User Configuration > Administrative Templates > Windows Components > Windows Error Reporting and double click on the first option and click on enabled.
4. That's All. You will never see the Error reporting window again. If you want to enable, then click on the Not Configured option.
2. Type "gpedit.msc" and press enter
3. Navigate to User Configuration > Administrative Templates > Windows Components > Windows Error Reporting and double click on the first option and click on enabled.
4. That's All. You will never see the Error reporting window again. If you want to enable, then click on the Not Configured option.
How good are you in SQL?
This is a simple online Quiz to test your knowledge in SQL.
At the end you can see the result.
At the end you can see the result.
Source : Computer World
How to brag any achievement in Mafia Wars?
Want to brag any achievement in Mafia Wars (Facebook) . Don't worry, here is a link for bragging any of the achievement.

Steps for Bragging:
1. Sign in to Mafia wars.
2. Go to this players profile - Click here
3. Brag the achievement you want!
HAPPY BRAGGING!!!!
To add me as a friend on Facebook, Click here
To join my Mafia, Click here


Steps for Bragging:
1. Sign in to Mafia wars.
2. Go to this players profile - Click here
3. Brag the achievement you want!
HAPPY BRAGGING!!!!
To add me as a friend on Facebook, Click here
To join my Mafia, Click here
My Stats

Download Microsoft Developer products for free!
Are you a student? Then you can download various designer tools from microsoft such Visual studio, SQL, XNA Game studio, etc. To download just go to DreamSpark. Then just follow the 3 steps in that site and you are done. Then Microsoft will provide you the download link of the respective software and you can use it for free.
The following products are offered free by Microsoft Dreamspark,


The following products are offered free by Microsoft Dreamspark,


Write protect the removable media in Windows 7!

Here is tweak in windows 7 that will deny the write access to any removable media,
1. Press Windows logo button + R
2. Type "gpedit.msc" and press enter
3. Navigate to User Configuration > Administrative Templates > System > Removable storage access and on the right go for "Removable Disks: Deny Write Access" and double click on it and click on enable and click OK.
4. That's All. Restart your Computer to take effect.
ASP.NET Controls (Data, Validation, Login, Web Parts)


Source : Microsoft MSDN Library
Embedded System Text Book!
This compiled HTML file contains the full text book of Embedded systems by O'Reilly. Click on the button to download it.
Internet Security Notes (Full)

To download the notes, click the download button below,

Download the file to your computer. Open the downloaded file with either WinZip or Winrar or 7Zip. If you cannot able to open the file, then just contact me at sudarshannadar@hotmail.com
Source : www.rajeshwatve.tripod.com
How to disable task manager in Windows 7!
1. Press Windows Logo button + R
2. Type "gpedit.msc" and press enter
3. Navigate to User Configuration > Administrative Templates > System > Ctrl + Alt+ Del Options and go for the 3rd option and click on enabled.
4. That's All!
2. Type "gpedit.msc" and press enter
3. Navigate to User Configuration > Administrative Templates > System > Ctrl + Alt+ Del Options and go for the 3rd option and click on enabled.
4. That's All!
Create a Windows XP bootable CD!
If you are wishing to create a bootable XP CD to reinstall windows, here is a simple step to create the CD!
1. Download the Software called nLite which will create the Bootable CD automatically. The download link is given below,
http://www.nliteos.com/download.html
2. Download the Installer (2.54 MB) from the site.
3. Install the software and after installing click the nLite icon in the desktop or from the start menu.
4. Then click next and locate the drive where you have copied the original XP CD.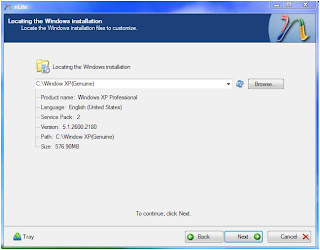 5. Then click next and click next one more time.
6. If you a want to integrate some drivers or service pack then click on the options which are available.
7.Make sure to click on the Unattented and Bootable ISO.
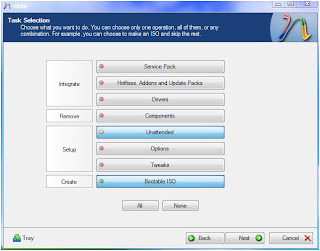 8. Then click next and put the Product Key.
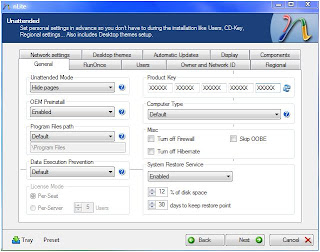 9. Then click next and click yes to start the process.
10. After the process is complete, click next.
11. Then click on the Make ISO button and locate the folder where you want to save the ISO.
12. Then Click next and click Finish. That's All. You have successfully created a bootable XP CD.
To create a Bootable Vista DVD, Click here
1. Download the Software called nLite which will create the Bootable CD automatically. The download link is given below,
http://www.nliteos.com/download.html
2. Download the Installer (2.54 MB) from the site.
3. Install the software and after installing click the nLite icon in the desktop or from the start menu.
4. Then click next and locate the drive where you have copied the original XP CD.
 5. Then click next and click next one more time.
6. If you a want to integrate some drivers or service pack then click on the options which are available.
7.Make sure to click on the Unattented and Bootable ISO.
 8. Then click next and put the Product Key.
 9. Then click next and click yes to start the process.
10. After the process is complete, click next.
11. Then click on the Make ISO button and locate the folder where you want to save the ISO.
12. Then Click next and click Finish. That's All. You have successfully created a bootable XP CD.
To create a Bootable Vista DVD, Click here
How to disable the CD/DVD Autoplay!

To turn off the autoplay, follow the steps given below,
1. Press Windows Logo button + R,
2. Type "gpedit.msc",
3. Go to computer configuration > administrative templates > system.
4. Search a entry called "Turn Autoplay off" & double click on it & change the settings as you want.
5. Restart your computer to take effect.
Windows 7 RC expected to release in May!
 The release candidate of Windows 7 will be released next month. Already Windows 7 beta is 4 months old and many of the bugs were fixed and more changes are made to Windows 7.Stay in touch to know more about the fixed bugs in Windows 7.....
Magic Gadget coming soon!

A new Japanese gadget is coming soon to rock the world!
In this gadget you can start or stop the music when the wearer sticks his tongue out. If he opens his eyes wide, then also the song will be changed.
This gadget is called as a "Mimi Switch" or "Ear Switch". It is similar to a normal headphone and it is fitted with a set of infrared sensors that will measure the tiny movements inside the ear! This gadget can also store data like a normal flash drive.
This gadget will also play a cheerful song, if you aren't smiling enough!!!
Make your Blog or Website Profitable!
If you are having a blog or Website, and you want to earn from it, then there are few Sites which are really genuine and pays regularly.
1. Google Adsense

This is the best and the one which is in the Top #1 List. If you are wishing to put Google Adsense in your Website, then just sign up for Google Adsense and put the ads in your Website. To sign up for Google Adsense click here.
2. Smowtion

This is an alternative for Google Adsense and this also pays regularly. To sign up for Smowtion click here
3. WidgerBucks

This is also an alternative for Google Adsense and this also genuine and pays regularly. To sign up for WidgetBucks click here
1. Google Adsense
This is the best and the one which is in the Top #1 List. If you are wishing to put Google Adsense in your Website, then just sign up for Google Adsense and put the ads in your Website. To sign up for Google Adsense click here.
2. Smowtion
This is an alternative for Google Adsense and this also pays regularly. To sign up for Smowtion click here
3. WidgerBucks
This is also an alternative for Google Adsense and this also genuine and pays regularly. To sign up for WidgetBucks click here


GTA IV - The Lost and Damned!!!

Rockstar is releasing an add on called The Lost and Damned for GTA IV which will run on the full version of GTA IV. But, currently rockstar is releasing this add on exclusively for XBOX 360 only.
In this add on, a new character is there and he is named as Johnny Klebitz, who is the member of the biker gang which is featured in several GTA IV missions.
This patch is going to release on 17 Feb - 2009!
Essential Softwares for Windows!!!
 Chrome is the safest and fastest way to surf the web. Chrome is very user friendly.
2. AVG Free Edition!
 This Software will detect any unwanted malware or spyware in the system and it will remove it. So use this antivirus and keep your PC Clean.
3. TuneUp Utilities!


This Software is used for optimizing any registry or other problems. This software also has more powerful features.
Toolbar Launched!
Now you can stay in touch with our site any time and any where! Just install our toolbar and access all the feature of our site easily. You can also earn money with our direct link which is in our toolbar. To install our toolbar Click here Enjoy....